• Home
  • About
  • Contact Us
  • Privacy Policy
  • Cookie Privacy Policy
  • Terms of Use

Mud Mixer MMXR-3221 – Stop mixing concrete the old fashioned way and save time and money!

By H0tN1cH3S

Stop mixing concrete the old fashioned way and save time and money!

In the world of construction, selecting the right tools can make or break a project. With decades of hands-on experience as a contractor, I’ve learned that investing time in researching the best equipment is as critical as the work itself. When it came to finding a versatile, reliable, and efficient mixer, I left no stone unturned. After extensive research, numerous comparisons, and leveraging my industry insights, I discovered the Mud Mixer MMXR-3221—a tool that stands out for its innovation and practicality.

Here are a coupe of my main observations:

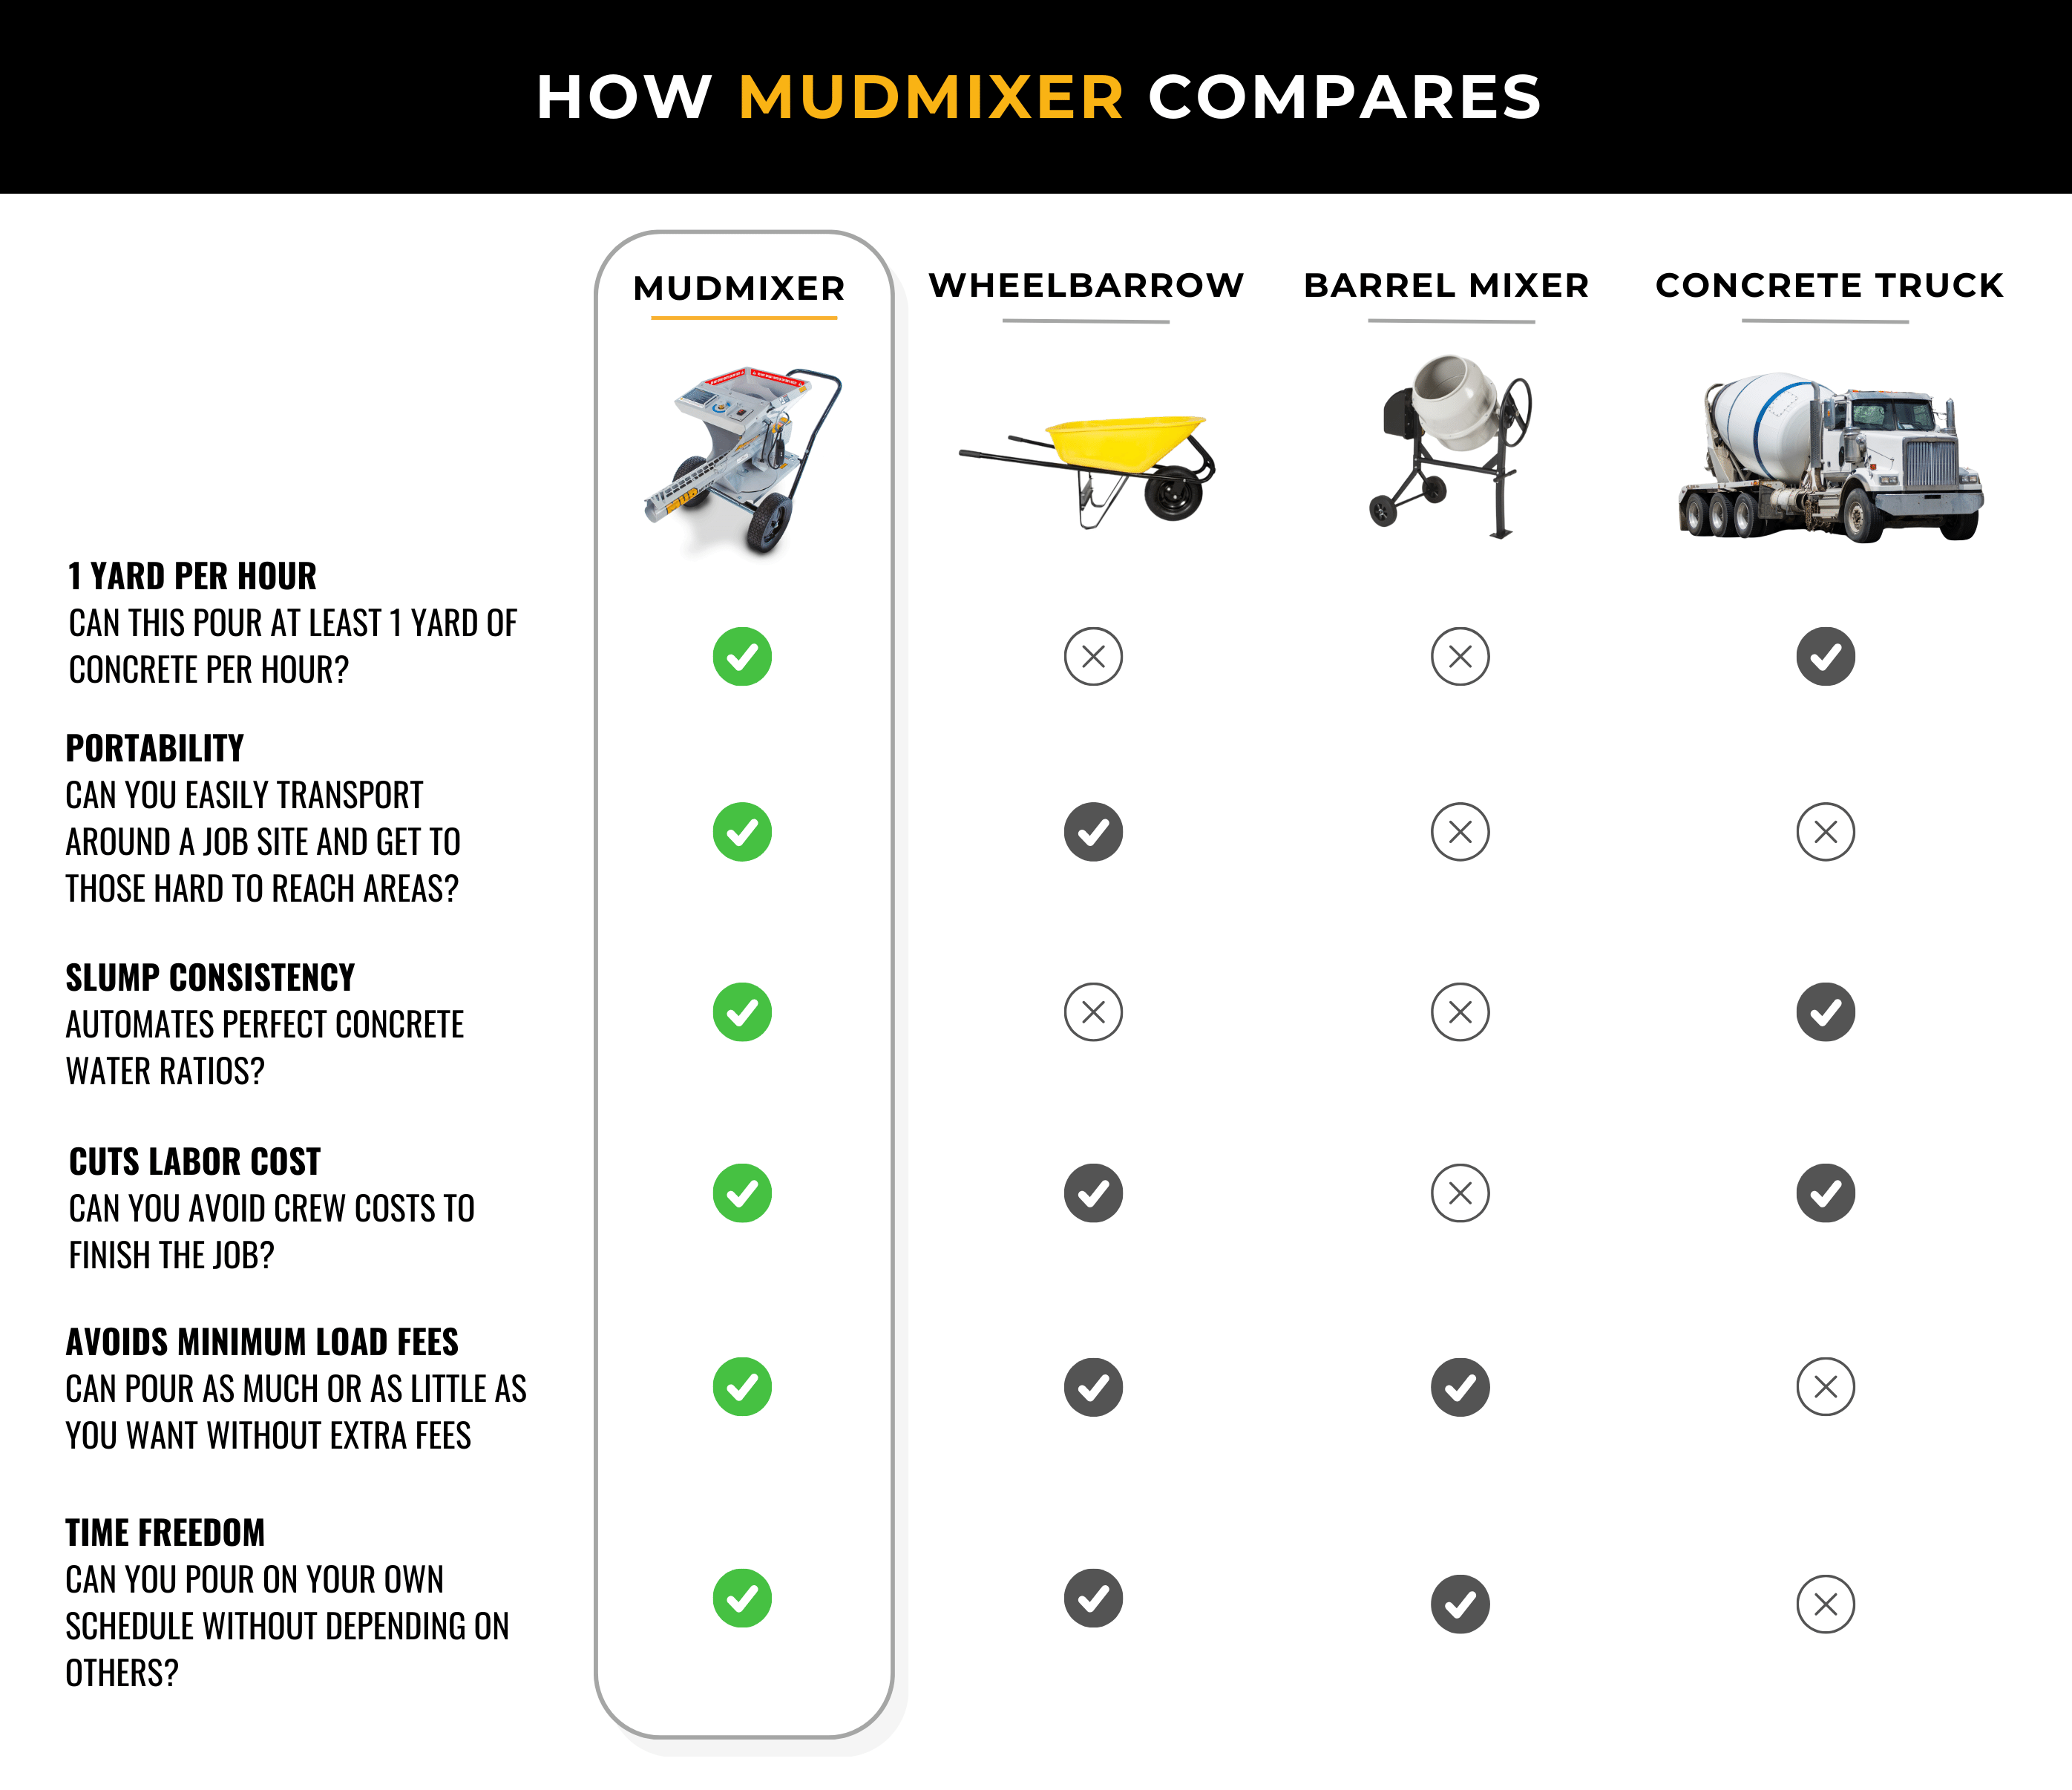
  • The Mud Mixer can be operated by just one person cutting labor costs.
  • Less product waste – add as much dry mix as you need
  • Fast  and easy clean up

In this article, I’ll share why the MMXR-3221 is a game-changer and how my thorough examination confirmed it as the go-to mixer for professionals.

Mud Mixer MMXR-3221

Introducing the Mud Mixer MMXR-3221: Your Heavy Duty Portable Multi-Use Mixer

In the world of construction and renovation, having the right tools can make all the difference between a job well done and a job that drags on. The Mud Mixer MMXR-3221 is one such tool that promises efficiency, power, versatility and ease of use. Whether you’re a seasoned professional or a DIY enthusiast, this mixer is engineered to meet your needs, offering the kind of performance that makes it an essential addition to your toolkit.

Key Features:

1. Powerful Motor: The Mud Mixer MMXR-3221 is equipped with a robust motor capable of handling even the most demanding mixing jobs. Whether you’re working with dense materials like concrete, mortar, or plaster, this mixer delivers consistent, high-quality, smooth, lump-free mixtures quickly.

2. Variable Speed Control: To cater to different materials and mixing requirements, the mixer features variable speed control. This allows users to adjust the mixing speed according to the viscosity and density of the material being mixed, ensuring optimal results every time.

3. User-Centric Design: Long mixing sessions can be physically demanding, but the MMXR-3221 is designed with ergonomics in mind. Its comfortable, well-balanced handles reduce user fatigue, while the sturdy design minimizes vibration, providing a smoother, more controlled mixing experience.

4. Durable Construction: Built to withstand tough job site conditions, this mixer boasts a rugged construction with high-quality materials. It is engineered for durability and longevity, making it a reliable choice for professionals who demand performance and reliability.

5. Multi-Use Capability: From small-scale projects to larger construction jobs, the Mud Mixer MMXR-3221 is versatile enough to handle various tasks. Whether you’re mixing mortar for bricklaying or blending plaster for wall finishes, this mixer delivers consistent results.

Applications:

  • Construction Sites: Ideal for mixing concrete, mortar, grout, and other building materials on-site.
  • Renovation Projects: Perfect for blending plaster, drywall mud, and other renovation materials.
  • DIY Projects: Great for homeowners tackling remodeling tasks such as patio repairs, fence installations, or small concrete pours.

Why Choose the Mud Mixer MMXR-3221?

  • Efficiency: Saves time and effort with its powerful motor and variable speed control.
  • Versatility: Handles a wide range of materials, catering to diverse project needs.
  • Portability: Lightweight and easy to transport between job sites or around the home.

Technical Specifications:

  • Motor Power: 1200W
  • Speed Range: 0-700 RPM
  • Weight: 8.5 kg (approx.)
  • Voltage: 110V/60Hz (or as per regional requirements)

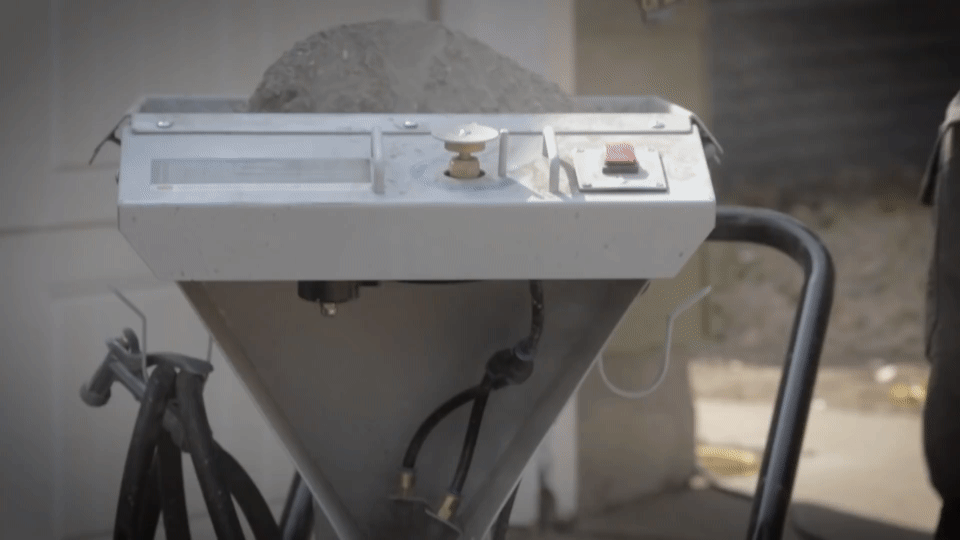
A Glimpse in Action:

To truly understand the capabilities of the Mud Mixer MMXR-3221, see it in action on the job site. Watch as it effortlessly mixes mortar, allowing you to focus on getting the job done right:

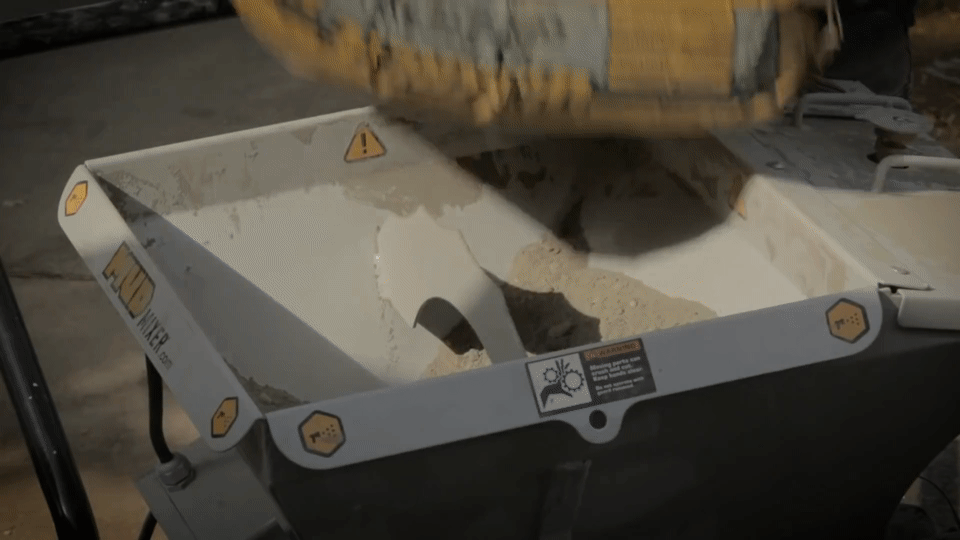
Step 1: Add the concrete by landing the bag on top of the Mudmixer’s bag opener.

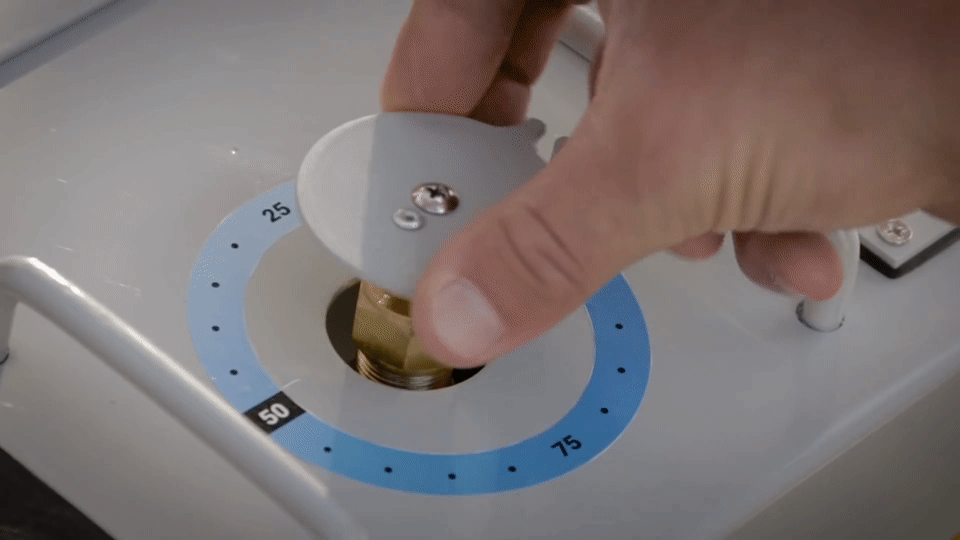
Step 2: Adjust the water flow to the desired concrete consistency

Step 3: Start your job right away

Conclusion:

The Mud Mixer MMXR-3221 is a game changer for anyone involved with construction or renovation.  It’s not just a tool but a partner in efficiency and quality for professionals and enthusiasts in the construction and renovation fields. Its powerful motor, ergonomic design, and versatility make it a standout choice for anyone looking to streamline their mixing tasks. Whether you’re working on a large-scale project or a weekend DIY endeavor, this mixer delivers the performance and reliability you need.

Don’t wait—experience the difference with the Mud Mixer MMXR-3221 and make your next project your best one yet.

Click here now to get yours today

Filed Under: Home Repairs

Home Repair Tips For Home Owners

By H0tN1cH3S

Do you own a piece of residential property? If so, it is your responsibility to keep the land and buildings in good condition. Whether you have just picked up a fixer-upper or live in a newer stick-built home, you should prepare for home repair situations to arise.

Couple working together on home renovation, woman holding spirit level tool, man holding hammer.What is your level of knowledge and expertise for basic construction work? Be honest with yourself about your abilities so you can get outside help when needed. You are likely to build up more repair costs to correct your mistakes, on top of fixing the original problem.

If you are going to hire a contractor, you should obtain quotes from three to five separate companies. This will ensure that you get the best rates and have a satisfactory experience. For larger jobs you might need a general contractor to work with various sub-contractors to complete the job.

Either way, you need to make certain that you hire a reputable business. You can ask folks that you know for recommendations or look online to find contractors advertising in your area. You can begin to compare them once you have compiled your list.

First, check the business websites to investigate their presentation. Can you find their contractor number, claims of insurance and other types of professional verification? Does the business have any affiliations or accolades from reputable sources? These help to prove the legitimacy and professionalism of the contracting company.

Next, you need to look up reviews for each of the home repair contractors. One at a time, enter the company name into your favorite search engine. Before you strike the “Enter” key, you should add the word “review” to your search query.

Click on several of the results and scan through them. Stick with sites that don’t accept money from businesses in order to remove bad reviews. Focus on ones that have been left within the past year, because older ones might not be indicative of the current business model and staff.

Eliminate any of the businesses that did not hold up to closer scrutiny. If any of them stand out at this point, you should move them to the top of the list. Once you have met with a representative and obtained quotes, you can proceed according to your needs and their availability.

On the other hand, you might decide to tackle some repair projects on your own or with the assistance of a friend or family member. If so, make sure that you have all of the materials and equipment ready beforehand. You need to have clear instructions for each step of the repair. Watch videos and read repair manuals repeatedly if you have any questions or uncertainty about any part of the process.

Whether your personal home has problems or you are flipping older residential properties, it is essential that the repairs are done right the first time. If you can perform the repairs yourself you might be able to save some cash, while hiring a reputable contractor can save you time and headaches. The choice is yours to make.

Filed Under: Home Repairs Tagged With: Repair Tips

Tips On How To Finish A Basement

By H0tN1cH3S

If you have always wanted to finish your basement to convert it into living space, you can do this very easily. Many people believe it will be too expensive or complex to complete on their own.

Depending upon the size of your basement, and what you would like to accomplish, it may only take a week or two to finish everything. At the very least, it will improve the value of your home and provide more living space. Here are a few tips on how to finish a basement, a project that you should consider doing this year.

What You Can Do With Your Basement

Most basements are designed to be a type of storage area. This is where people will store boxes of their belongings, or excess furniture that they do not want to sell. However, if the basement is large enough, it can serve as another bedroom. Others will convert this into a game room or den. It is also in a prime location for creating a home theater room. You will be able to play your movies as loud as you want. To convert your basement into any of these possibilities, it begins with framing and insulating this area.

Start With Framing And Insulating Your Basement

To transform your basement into a room, you must begin by framing the basement. You may have to have plans drawn up and submitted to your local building department. Your plans will include the walls, doorways, and special features such as adding a fireplace. You also need to check for mold and leaks that may be occurring. Once these problems are resolved, you can then begin to frame the basement area. The installation should be extruded foam insulation. This will be glued to the foundation walls and rim joists. Also use high R-value insulation, and avoid expanded foam insulation which is not as durable. Once done, you will caulk any seams or gaps, followed by sheet rock on the interior of the framing. This should only be done once you have added all of the electrical wiring and sockets.


How To Finish A Basement Remodeling Project

To complete the job, you can spackled the outside of the drywall, and then subsequently paint everything. It is recommended that you use some type of semi gloss, similar to what you would use in the kitchen or bathroom area. This will make it easier to clean, and will also help promote the distribution of light when using brighter colors. The entire project will be complete once you have added tiles or carpet to the floor. You will also need to bring all of the furniture that you want into this newly improved basement area. This process may take several days to complete, but it will be well worth the effort.

This project is one that many people think about doing, but often do not because they believe it to be too difficult. It will only require a minimal amount of materials, and a few weeks of your time, to create the plans and complete the project. Instead of just using your basement as a storage facility, it can be so much more. Now that you know how to finish a basement, you should start thinking about all of the different ways that you could use this area of your home.

Filed Under: Home Repairs Tagged With: Basement, Remodeling

Recent Posts

  • Mud Mixer MMXR-3221 – Stop mixing concrete the old fashioned way and save time and money!
  • Home Repair Tips For Home Owners
  • Floor Refinishing Projects For Your Home
  • Tips On How To Roof A House
  • Tips On How To Finish A Basement
  • House Painting Tips So Your Home Looks Amazing
  • Home
  • About
  • Contact Us
  • Privacy Policy
  • Cookie Privacy Policy
  • Terms of Use

Tags

Anything in here will be replaced on browsers that support the canvas element

  • Painting Walls
  • Basement
  • Remodeling
  • How To
  • Roof A House
  • Refinishing Floors
  • Repair Tips

Copyright © 2025 · Log in